3.28.2012
Ceramic Love.
Okay, do you know that beautiful moment when you find an ingenious but simple and inexpensive craft idea? Well I just had this moment. ceramic. markers. For a few years now we have had these white ceramic mugs that were just so incredibly boring. So I went to Michael's, bought a ceramic marker, and drew all over them. I then couldn't make myself stop, so I found these other random dishes in our cabinet and decided to bring some new life into them as well. After you decorate your heart out, you must wait 24 hours then bake them in the oven for 35 minutes at 300 degrees. The ink is then dishwasher safe, and won't bleed. Incredible, I tell you!
Michael's also has different colors and sizes of tips. To that I say "yes, please"! This ceramic pen thing is fabulous.
- <3GM
3.22.2012
Studmuffin.
Yesterday my best friend and I went thrifting for some cute shorts and then got out our studs and went to town. This was my first studding experience, and I learned a few things along the way. (1) Your fingers will hate you. The front of the studs that we got weren't sharp, but the parts that stick into the material....are from the devil. I don't know what it is like when you have a studding tool, but if you only use your hands, beware. (2) It takes a while. (3) Studs look good on everything. Seriously. Pull out something in your closet and envision studs on it (in a tasteful way, of course). Looks pretty rockin', right?
Here are my thrifted shorts, with just a tiny bit of studding.
This is my 3-quarter sleeve jacket with some added metal.
I will definitely be experimenting with this more in the near future!
<3-GM
3.18.2012
Closet Inventory: hats
This is the first installment of Closet Inventory; a grouping of blog posts showing you some beautiful things from my closet. Up first-HATS.
#1. My newest hat (shown below) was bought mostly because I'm going to Paris in a few months and I refuse to go to France for the first time without a big floppy hat. Bought from my favorite company-ModCloth for only $25. It falls so perfectly! Everyone should have a big floppy hat. They bring happiness.
#2. Very colorful, soft material, and well made. I got it as a present a few years ago.
#3. This is the hat my Pop-pop wore to my parent's wedding, with the addition of some peacock feathers. Sentimental and cute.
#4. New York and Company white fuzzy hat that I love.
#5. This one makes me feel like I'm five years old again. In a good way. :)
#6. I made this hat when I had five minutes to spare in sewing class. Yeah, that's right. Be impressed.
#7. Another one of my Pop-pop's hats. Looks dorky on me, but it has a quaint little home on my shelves.
#8. My wonderful sister bought me this one (from Icing) for my birthday. Makes me want a french accent!
#9. Last but not least, my fedora. Found at a thrift shop. I couldn't resist. I mean how incredible is that button?
Well I hope you enjoyed this first Closet Inventory! Writing this post made me realize that I don't wear hats as often as I should. I will now. I promise. (:
<3-GM
3.09.2012
5 ways
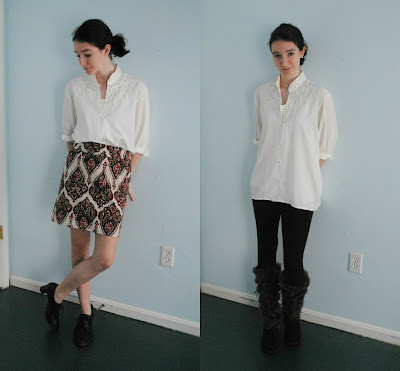
The other day, a friend of mine gave me this beautiful button-down. when I saw it, a bazillion different ways to style it came to mind. Thus, I got out my camera, attacked my closet, and came up with these....
5 Ways to Wear a White Button-down!
5 Ways to Wear a White Button-down!
- pencil skirt (Forever 21) and desert boots (Steve Madden)
- purple pants (Delia*s), sparkly flats (Walmart-shhhhh), grey blazer (Forever 21)
- dark skinny jeans (Target), red floral peep-toes (Marshall's)
- pencil skirt (Target) and oxfords (thrifted!)
- basic cotton leggings (Target) and fur wedge boots (Delia*s)
Have a blessed day!
<3-GM
3.02.2012
DIY watermark tee!
When my sister was home on break, our friend Catie joined us in a craft day. Thanks to the beautiful world of Pinterest, we found a great and fairly simple DIY project - making watermark tees. All you need is a white t-shirt or tank top, Elmer's Blue School Gel and Fabric Dye in whatever color your little heart desires (we went with Teal and Blue "Rit" dye).
First, wet the shirt. Then (depending on the size) either lay it flat on top of a table or put a plastic lid inside of the shirt (to protect the glue from going through to the other side). Now it's time to personalize! Use the glue and write/draw/create anything you'd like! Since I'm going to Paris in June, I wrote "Paris Bound".
First, wet the shirt. Then (depending on the size) either lay it flat on top of a table or put a plastic lid inside of the shirt (to protect the glue from going through to the other side). Now it's time to personalize! Use the glue and write/draw/create anything you'd like! Since I'm going to Paris in June, I wrote "Paris Bound".
My sister drew a seagull!
Now let them dry. For us, it took about 5 hours. While you're waiting prepare a tub of cool water and add whatever amount of dye you think is right for you. Realize, however, that the color of the water will be way darker than the finished product.
Try not to be as messy as I was!
Lay flat or hang them up over some trash bags to dry. Soak your tee in cool soapy water for 15 minutes. Then wash and dry as you would normally. Ta-da! You now have your very own personalized watermark tee or tank!
<3-GM
Subscribe to:
Posts (Atom)


